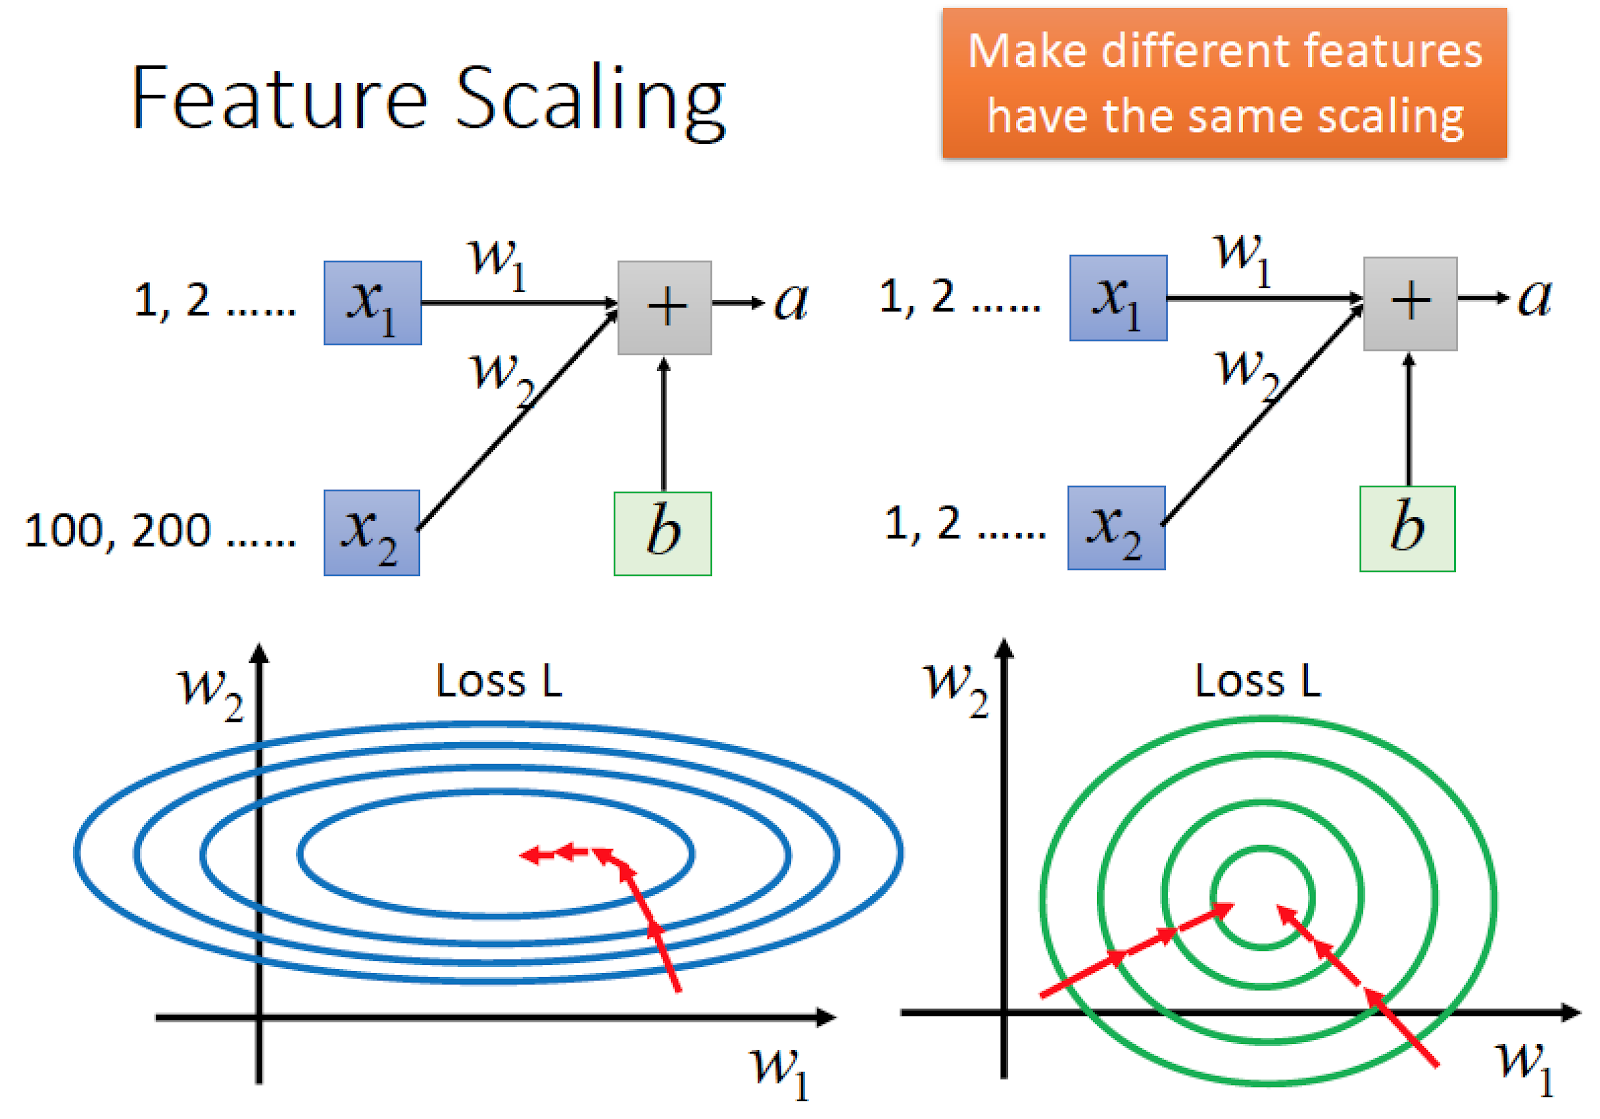
RoR week4 一步一步玩rails+bootstrap
- 取得連結
- X
- 以電子郵件傳送
- 其他應用程式

step1:
rails new MyLibrary
step2:
cd MyLibrary
step3:
參考網址如下
編輯 Gemfile
加上這一行
gem 'bootstrap-sass'

step4:
存擋後打指令
bundle install
step5:
去 app/assets/stylesheets/
把application.css 改檔名成
application.scss


step6:
可以把scss檔案想成有超能力的css檔案,可以在裡面寫變數寫迴圈等等
編輯application.scss檔案
加入這兩行
// "bootstrap-sprockets" must be imported before "bootstrap" and "bootstrap/variables"
- @import "bootstrap-sprockets";
- @import "bootstrap";
step7:
去assets/javascript/
裡面編輯 application.js

加入下面的
- //= require jquery
- //= require bootstrap-sprockets
step8: 導入bootstrap

step9:
- rails generate scaffold Book title:string content:text page:integer publish_date:date
p.s. 如果這步驟想要砍掉重弄,使用
- rails destroy scaffold Book title:string content:text page:integer publish_date:date
再重新建一次
step10:
- rake db:migrate
啟動server
在專案資料夾(MyLibrary)中 rails s
rails server 就可以開始跑在預設 port 3000
step11:
滑鼠移過去
看到這個黑黑的是因為 scafford.scss造成的
不喜歡可以把它刪掉


step12: 修改table外觀
在<table>裡面加上 class="table table-hover"


step13: 修改button外觀
在下面的
<%= link_to 'New Book', new_book_path%>
加上class:'btn btn-success'
<%= link_to 'New Book', new_book_path, class:'btn btn-success' %>
效果

這些相關內容可以去這裡查看
例如上面的button success 是綠色的
其實還有其他選擇可以用

step14: 要新增一個db migration該怎麼做?
rails g migration add_price_to_book active_record
這裏的 g 是 generate 的簡寫
指令打完後
在migrate資料夾會看到最新的migrate檔案.rb 編輯它你想要家的欄位

除了add可以用以外,也可以 rename remove
編輯完後再
rake db:migrate

以上動作只改了MVC架構當中的M
必須還要再手動改其他兩個才會看得到
接著去編輯(V) views 資料夾當中 books 裡面的 _form.html.erb

加上price
r
記得其他的view也要加上price的部分


接著
還需要controller的部分也要做出修改

再 book_params裡面加入 :price
- simple_form 套件
gem 'simple_form'
說明看這
再bundle install
因為我們想要讓bootstrap用它所以要用這段指令
- rails generate simple_form:install --bootstrap
下完之後,重新啟動一次 rails server
rails s

接著來使用simple form
去views資料夾底下 _form那個html
原本這樣

把它改成這樣

效果:

- 取得連結
- X
- 以電子郵件傳送
- 其他應用程式


留言
張貼留言